Responsibilities
Set designer and constructer, cueing system for actors, physical interaction designer and fabricator, costume designer
Skills and Softwares
Set design, costume design, lighting design, fabrication, construction management, art direction, teamwork, presentation skills, Maya, QLab 4
Overview of Project
In the Spring of 2018, I pitched an idea for a potential semester-long project at the Entertainment Technology Center with three other teammates. We wanted to expand upon the idea of combining animation with film (such as with Mary Poppins) and take it a step further, into live theater performances. Our team asked the question: what if you could place an animated, augmented reality character on a live stage and have it interacting with real actors and the world around it?
After two rounds of pitching our concept to the faculty and going through iterations of our concept, our project was approved for the following semester.
In the Fall of 2018, we began our project with a full team — Dan Wolpow (director and producer), Euna Park (animator), Cassidy Pearsall (media production manager), Sudha Raghavan (programmer), and Apoorva Ramesh (programmer). I would serve as the physical interactions and set designer. We had 15 weeks to conceive, create, stage, and showcase a short, proof-of-concept live performance that combined an AR character with a real stage and actors.
In the end, we chose to stage part of the famous opening scene of Peter Pan because it features the character Tinker Bell, a magical fairy who, alongside Peter Pan, visits the Darling family in Edwardian London before flying off to Neverland. For the first time in a stage performance of Peter Pan, we depicted Tinker Bell as a fully three dimensional (with an actual body and face), who can fly around the nursery, zooming behind as well as in and out of various objects. She expresses herself clearly with body language and requires significantly less suspension of disbelief to accept her as a living, breathing character.
The end result was a short performance piece as proof of concept for AR’s expanding applications in the entertainment industry:
Learn more about the overall project here.
Overview of My Role
Throughout the semester, I served as the physical interactions and set designer for our show. To really bring our Tinker Bell to life, we knew we needed a physical world the character could interact with. In order to give Tinker Bell the appearance of a true physical presence, she needed to have actions that could change the world around her or influence the actors. Furthermore, we would need a set that could work with the limitations of our AR hardware. As AR is in its infancy and we had to work with the HoloLens, which has a number of issues – most notably with its field of view – the set needed to account for these issues as much as possible in order to create a believable performance.
Over the course of the semester, I designed and constructed the set, developed costumes, and created “magical” moments using sound and light cues that made Tinker Bell appear to really inhabit the same space as the actors and audience. For a full description on how these tasks were done, please see below.
Story Selection
At the beginning of the semester, during the pre-production phase, while half the team worked on prototypes for different AR headsets to determine the best on for our project, the other half spent a week going through as many public domain stories as possible to determine possible narrative options for this project.
While our programmers and animator were going through different headsets, before eventually landing on the HoloLens, the rest of us were trying to determine possible story options. When a story was determined as a possible choice, it was placed in the chart below, along with a summary of the scene that we might adapt from the story, the characters needed, possible interactions between the AR character and the physical world, and the pros and cons of adapting said story.
Once we had our list of large-scale choices, we held a team meeting where we conducted a “King of the Hill” battle between the choices. All six team members chose their top option(s) and then, all other options were compared to the top choices, to finally get our top three choices: Peter Pan, A Christmas Carol, and The Raven. From there, we did a deep dive into the pros and cons of each choice, before choosing our story: Peter Pan.
The story of Peter Pan and the adaptation of Tinker Bell into an AR character in the HoloLens worked well for a number of reasons: it’s a recognizable story, Tink is a small and magical creature that fits well into the limited FOV of the HoloLens, and the fact that she flies makes the issue of potential drift in the AR headset far more forgivable. Additionally, the fantastical and wondrous nature of the nursery scene of the story, when Wendy first meets Peter and Tink, matches well with the potential excitement of seeing an AR character interact with the real world live for the first time.
While designing the real world elements of this piece, we had to first consider what limitation we would have based on the desired AR technology we would choose to integrate. The various flaws in each headset or mode of mixed reality offered different limiting factors for each sub-system of the space, such as poor holographic rendering at a distance, diminished capabilities at accommodating darker lit scenes, and more. Due to these varied factors we were only able to solidify our scenic and stage lighting systems after several weeks of testing and prototyping various AR headset models.
Set Design
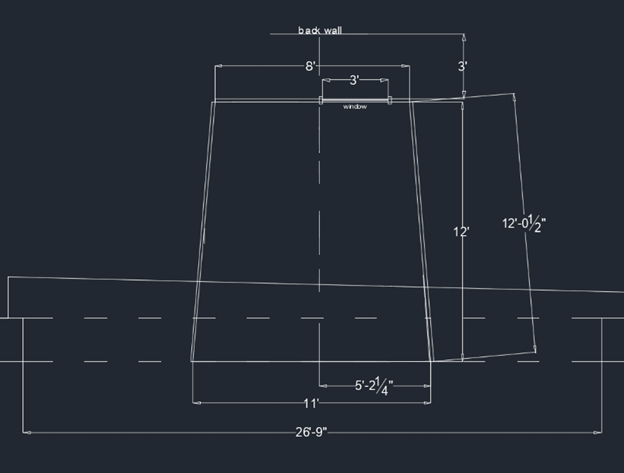
The first practical limitation that came our way was the size of the field of view for the HoloLens. The hardware had been locked and the story was chosen, so the set had to work around both constraints. Given the limited FOV and the fact that we were planning on showing these performances to naive guests, some of whom had never worn an AR headset before, we needed to make the experience as intuitive as possible. While most traditional theatrical sets are elongated along the horizontal axis, with little depth along the upstage line, we went the opposite way. The set was longer than it was wide so that the audience’s field of view encompassed almost all of the set at once, so they would not have to rapidly move their heads to follow Tinker Bell’s rapid movements. We tried a number of possible set layouts before landing on the final design and dimensions of the set:
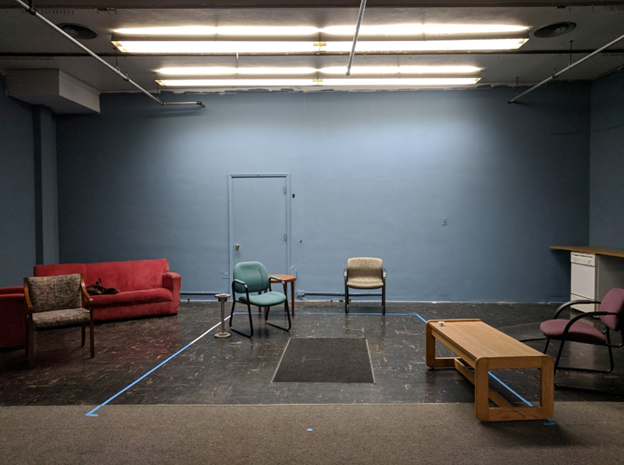
The set, mapped out in our theater space, with placeholder furniture to give an idea for the general feel of the size, looked like this:
Once the narrative was set as the nursery scene from Peter Pan and the overall size of the set was determined, the design of the set began. It was from the text that we determined the most important components that would need to be included in the set. First, we looked at objects that Tink interacted with, as that would be the most important items to include in our set. From the original play:
Then the window is blown open, probably by the smallest and therefore most mischievous star, and PETER PAN flies into the room. In so far as he is dressed at all it is in autumn leaves and cobwebs.)
PETER (in a whisper). Tinker Bell, Tink, are you there? (A jug lights up.) Oh, do come out of that jug. (TINK flashes hither and thither?) …
(TINK pops into the drawer where the shadow is, but before PETER can reach it, WENDY moves in her sleep.) …
WENDY. I see her, the lovely! where is she now?
PETER. She is behind the clock.
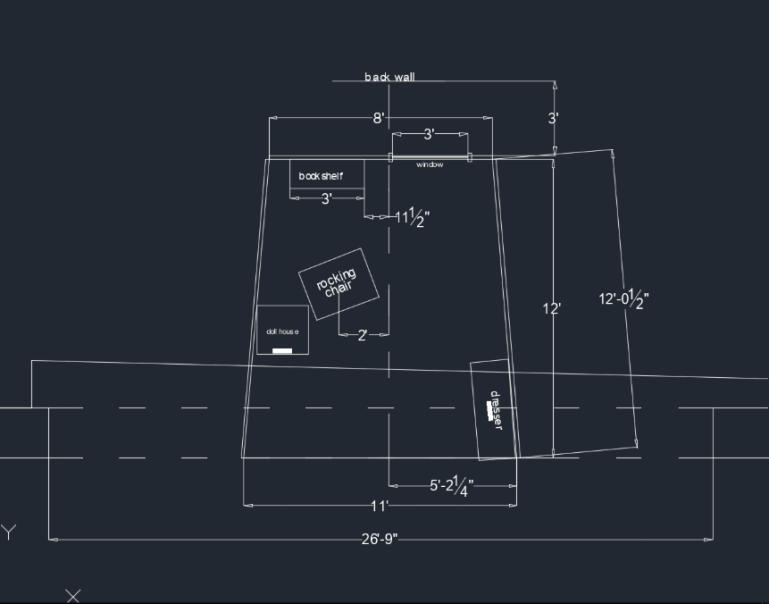
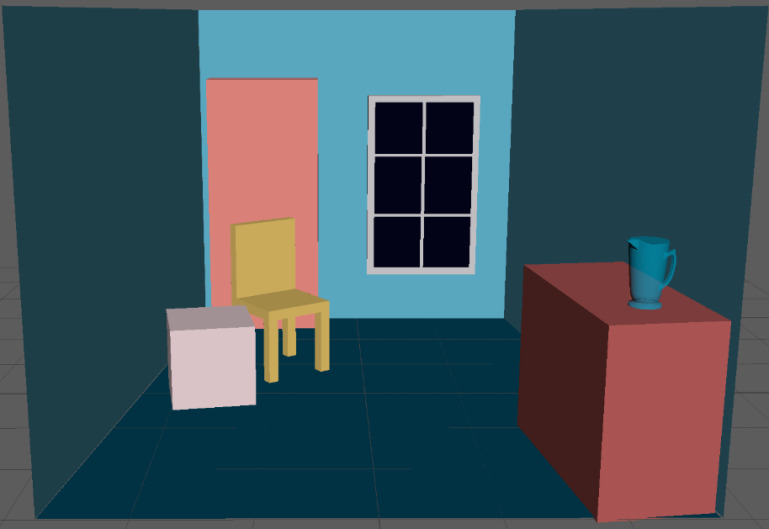
Combing through the small section of the play we were adapting gave us a great start in determining what were the most important objects to include in our set: a window, a jug, a dresser with drawers, and a clock. And while the nursery in typical adaptations of Peter Pan include large-scale objects, such as beds, we knew that with our limited time and size of the set, we could not include these bulky pieces of furniture. Thus, we reinvisioned this scene as taking part in just a portion of the nursery — specifically, the play area. Then, all we would need was some seating, storage furniture, and toys, in addition to the necessary objects for interactions, to make this set come to life.
The largest pieces of furniture that would be needed would be a window for Peter and Tinker Bell to enter through, the dresser for hiding the shadow, a bookshelf for holding the clock Tinker Bell would hide behind, a rocking chair for Wendy to fall asleep on (rather than a far bulkier bed), and a dollhouse for Tink to go into. With the main pieces of furniture placed, we were able to map out the set to look something like this:
With the overall layout of the set decided, next came the choices for color and aesthetic. We knew that we wanted the colors of the set to be highly saturated, as AR objects show up best against saturated backgrounds, but still childlike. Then came the decision of a visual metaphor, that would help guide all aesthetical choices so that everything felt cohesive. We decided upon two metaphors: Wendy’s world would be like a children’s birthday party (bright and colorful, but still very real), while Peter and Tinker Bell’s world would be like champagne on New Year’s Eve (light and airy and almost magical). From there, we determined the color palette for the set, along with the colors for each item in the set:

Set Construction
It was imperative to get the general layout of the set installed as quickly as possible, in order to leave time for our actors from CMU’s School of Drama to acquaint themselves with the set and the difficult challenge of acting with a character they cannot see. Providing them the full set to rehearse with gave them the ability to see what acting naturally in the space provided would entail from the beginning, and to get the blocking down as early as possible. The blocking was especially important for our project, as we needed to see where the actors naturally tended to position themselves towards key moments inside the space, so that Tinker Bell’s blocking and positions could be changed if necessary to accomodate for the actor’s movements.
But the set was not just about having physical objects in the space for the actors to move around. Lights and speakers needed to be installed, cue signals needed to be implemented, and practical effects had to be added. For all that to happen, we had to create a hierarchy of importance.
At the top of this list was lights and sounds that would inherently ground Tinker Bell in the physical realm. Therefore, the first effects installed were the DMX lights. However, all lights needed to be hidden throughout the set, so as to not ruin the illusion that it was Tink’s fairy light that was illuminating the objects. This decision then affected every decision for placing lights inside the set and practically, how it would all be hidden.
From there, the issue became a matter of effectively running wires and lights throughout the set without having it be seen by audience members. Small holes were drilled into the set, in areas that would be hidden by the audience most, and wires run through this. These holes included areas behind the dresser, behind the bookcase, and in the bottom corner of the set, next to the bookcase and obscured by the dollhouse.
Actor’s Cueing System
In order to keep the actors up to date at all times on the location of Tinker Bell’s whereabouts in the digital world, we needed to create a cueing system that would subtly tell the actors where and when to look, without breaking the immersion for the audience. This need was particularly important because, in addition to the actors not being in headsets and thus unable to see where Tink is at all times, the clicker for the HoloLens that would cue Tink’s animation would not always reliably work in time. Therefore, the actors would need as much support from us as possible in order to believably interact with an AR character.
We looked into how movies that use CGI characters do it — by holding up mannequins or balls on strings to indicate where the character will be when the actors are performing live. Though we couldn’t do that during our production, we were inspired by the idea of providing some sort of visual indication as to where Tink would be and thus came up with the idea of placing cue lights throughout the set. These cue lights would go in places where Tink would hover, so the actors could look right at the light from their mark and seem as though they were meeting Tink’s eyes. All we would need to do is drill pinpoint holes into the walls where the lights would need to go and turn them on at the right moments.
We also decided to use positional audio to clue the actors into where Tink was, spatially, in the room at all times. The start of her audio (flight sounds or her bell-like language) would let the actors know that the next cue had successfully begun, while the location of the audio would give them a rough estimate as to where she was in the room. The movement of sound from one speaker to another during a cue would also hint to the actor if Tinker Bell was moving throughout the space.
In the end, we placed in four cue lights (two on the left wall and two on the right) and five speakers (two in front of the set, one in the dresser, one behind the dollhouse, and one below the clock) to create our cueing system. Had we more time to iterate and finess upon our production, we would have liked to add in a few more cue lights, such as one right next to the clock that would help the actors know where to look when talking to Tinker Bell in that spot.
Show Controller System
It was imperative that we made Tinker Bell feel as grounded in the physical world of the actors as possible. Therefore, she needed to be able to perform actions that had consequences in our reality. From the text and from our own brainstorming meetings, we came up with a list of interactions that Tink could have with the physical world. From there, we condensed this longer list into one that we felt could be completed in the course of a semester:
- Open window
- Light up jug
- Light up clock
- Sound like she’s in the room
- Pull on Wendy’s hair
- Light up dollhouse
- Open drawer
These seven interactions became the basis by which we picked our cueing system.
We used 9 DMX lights (one in the jug, four in the dollhouse, four for cueing the actors), 3 kitchen lights with a dimmer pack (behind the clock), and 5 speakers (one to the left of the stage, one to the right of the stage, one in the dresser, one behind the dollhouse, and one below the clock) to create the effects needed for our performance.
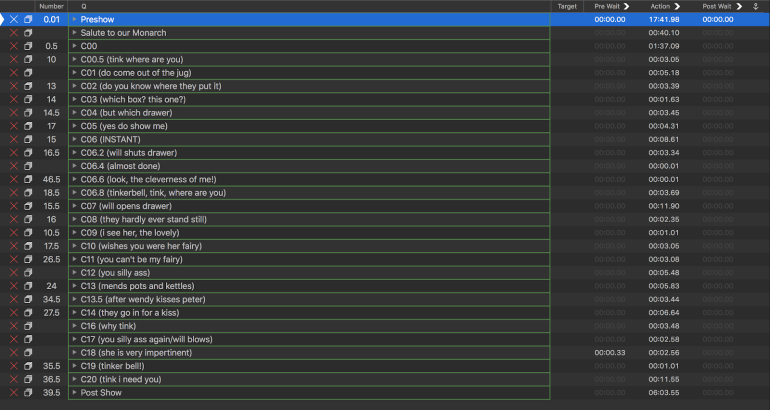
The five speakers on one audio controller and 12 lights on one DMX controller were all hooked up to Qlab 4 and the sequences were created to be timed perfectly with the animations. Groups of lights and sounds were created for each cue of the animated and labeled in the same manner (i.e. C00, C01, C02, etc.). Inside each group, we programmed the audio and lights to begin, wait, or end at specific times, corresponding to Tinker Bell’s animations in Unity. This way, when the signal was given that Tink had started her next animation during the performance, the corresponding cue in Qlab 4 could be started immediately and the practical and digital effects for Tink lined up.
Physical Interactions
Window
The illusion of Tinker Bell opening the window is one of our more low-tech solutions, with our actor for Peter Pan pushing the window open before Tinker Bell enters when given the sound cue for a gust of wind. He would then push the window open with his hand, making sure to keep his arm above the top of the window, so that this solution could not be perceived by guests. In the end, this low-tech solution worked perfectly with our needs and provided us the answer for keeping the magic and saving on time and money.
Jug
We knew that in order for Tinker Bell to appear as though she had flown directly into the jug, there must be a DMX light underneath the frosted jug. In order to hide the light, a box needed to be placed under the jug, large enough for a small DMX light, with holes carved in to let the light through. Given these constraints, we were able to find a box that looked like a stack of books, which both gave the hidden effect we needed and fit into the aesthetic of the nursery we were creating. A hole was carved into the top and the frosted jug placed directly above it, so that the jug appear to be lighting up from the base. A second hole, at the back, base of the box, was used to run wires to the DMX light.
Dollhouse
In order to make it appear that Tinker Bell was moving through the dollhouse, a different DMX light had to be hidden in every room of the dollhouse. The dollhouse was placed so that it directly faces the audience and lights placed behind it, so that light would shine through every window. The windows were covered with a semi-opaque paper that hid the appearance of the DMXs, while still allowing the light to shine through. Finally, each light inside the dollhouse was cued in sequence to match up with the spot where Tink entered the dollhouse, move through the house in an orderly sequence, and turn off at the spot where she left the dollhouse. The rattling of furniture was added to this sequence, at the speaker behind the dollhouse, to give the appearance that she was moving things around as she went through the house.
Clock
While it was not specified how Tink would go behind the clock, we had originally envisioned that she would fly to the bookshelf and behind the clock from one side, before flying out from the other side. This practical effect would need three strips of lights that could turn on in sequence to suggest that she was moving inside the clock. While we did find three kitchen lights that were the ideal size to create our effect, and a dimmer pack to connect them all, the kitchen lights were unfortunately not able to dim. And due to the limited time we had once the lights had been installed, the practical effect had to be altered.
Thus, like with the jug effect, the animation was changed to make it so that Tink flew behind the clock from above, and the two sides of the clock covered with books, so as to explain why she could not enter from the sides. The kitchen lights were then able to come on all together once Tinker Bell went behind the clock, creating the illusion that Tink ducked behind the clock from above.
Drawer
From the start, we knew that we wanted Tinker Bell to pull open the drawer where Peter’s shadow hid, to make it seem as though she had real physical weight and agency in this world. Originally, we had planned to use a Phidget board connected to an actuator that would push open the drawer, hooked up to the same show controller system that is used in the Cave at the ETC, which can run lights, audio, and Phidgets. However, as was described in the section for “Cueing System,” we had to switch over to Qlab and no longer use the show controller that could work with Phidgets as well, in order to create positional audio cues.
Costume Design
The costumes for Wendy and Peter were both outlined in the original script. As it was nighttime and Mr. and Mrs. Darling had tucked their children into bed when Peter Pan appeared, it can be assumed that Wendy would be in a period-appropriate nightgown. Peter was the harder character to design for because, as the text states:
PETER PAN flies into the room. In so far as he is dressed at all it is in autumn leaves and cobwebs.
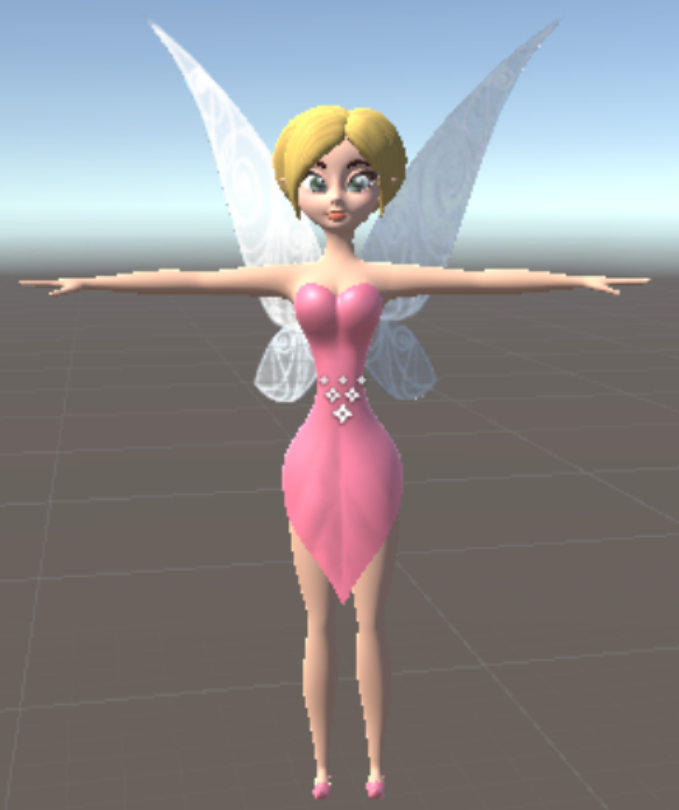
We knew that we did not want to put Peter or Tinker Bell in the typical green leaves outfits that are so famously depicted in the 1953 Disney adaptation of Peter Pan to not invite further comparisons to the Disney characters. We understood that the costumes we created for Peter and Tink and the animations for Tinker Bell in 15 weeks could never stack up to the Disney classic and so did not want to give our guests the impression that we were trying to compare ourselves to them.
And so the visual metaphor was used again. Wendy would be grounded in reality, with highly saturated colors that look like a typical nursery. These saturated colors also helped the objects in the set look heavier. But Peter and Tink, who could fly, needed to be lighter and bouncier — like champagne bubbles. Thus, I chose loose and flowy clothing for both that would have a light, champagne gold color to add to the airiness of their movements.
But because there was not enough time to customize the costumes and make them from scratch, the majority of the costume pieces were purchased online, premade. Peter’s costume would be in a light gold tunic and men’s culottes, accented by gold leaves, while Tinker Bell would be in a light gold dress.


Wendy, as the connection between her real-world nursery and the fantastical world of Neverland, would be in a flowing nightgown of light pink. In addition, her costume includes a locket large enough to hold a button, which Peter is said to hand to her in the text.


However, due to the primitive nature of the technology, we could not go with our ideal color choices for Tinker Bell. While she looked lovely in the light gold color in the HoloLens itself, she appeared grayed out in every possible method of screen casting of the HoloLens material that we tried. Therefore, we needed to pick a more saturated color for Tinker Bell that would not appear grey in the recordings or live screen casts. Given the colors we had already chosen for the set and Wendy, the natural choice was a bright pink, so that she did not stray too far from the aesthetic choices of the rest of the world.